• You are not logged in.

DreymaR's Big Bag Of Keyboard Tricks – USB2USB edition!

  • Started by DreymaR
  • 63 Replies:
  • Reputation: 210
  • From: Viken, Norway
  • Registered: 13-Dec-2006
  • Posts: 5,343
DREYMAR'S BIG BAG of KEYBOARD TRICKS – ÞE OLDE PAGES

The Big Bag has moved! Go find the updated and more wonderfuller Big Bag at https://dreymar.colemak.org/Now Even Trickier!

Instead of separate platform topics, over there you can select a platform icon and get implementation info in handy context boxes.

Some less central content may not (yet) have been moved though, so if you're missing something make sure to look in both places before you despair.

The TMK/Controller content is not fully present on the new pages, so do read section [4] below for guidance. Just be aware that other content here may be outdated.


    Tmk-DH1-5_RBo_ETROI.png


DREYMAR'S (USB++): DreymaR's Extensive Yet Modular ARSenal – for QUICKIE USB-2-USB & other TMK devices

There is a Big Bag of Keyboard Tricks Main Topic, in which I go into detail on what the different tricks are.

I also have topics focusing on different implementations of the Big Bag Of Keyboard Tricks:
• The Big Bag (PKL) for Windows (or go straight to the GitHub EPKL repository)
• The Big Bag (XKB) for Linux
• The Big Bag (TMK) for programmable "QUICKIE" devices – you are here!
• The Big Bag (Mac) for Karabinier by mkborregaard


DREYMAR'S BIG BAG OF TRICKS for QUICKIE USB-2-USB devices

WARNING - Some Assembly May Be Required (if you want a specific locale/ergo variant for instance)

[1]    Character/Key Mapping Layers
[1.1] (My Colemak[eD] AltGr mappings)
[1.2] Extend layers using Caps Lock (and Tab) as switch modifier(s) for navigation/editing/browsing/etc from near the home position

[2]    Ergonomic Key Remappings
[2.1] Angle/Wide ergo modifications to improve wrist angles, hand spacing and right pinky stretch/load effort
[2.2] Colemak-DH alias the Curl(DH) ergo mod (deprioritize middle columns without keys changing fingers)
[2.3] Symbol key mods for the adventurous (better apostrophe and/or hyphen positions; Work-In-Progress)
[2.4] Modifier modness for the adventurous (Sticky, One-shot etc; Work-In-Progress)

[3]    Layout Variants
[3.1] Tarmak transitional Colemak layouts for learning Colemak in smaller steps if so desired
[3.2] (Locale and phonetic layout variants)
[3.3] Mirrored Colemak that allows one-handed typing without extra learning

[4]    Download and Setup
[4.1] Download and Install
[4.2] Keymap Configuration
[4.3] Device Flashing
[4.4] Hardware Implementations

[–.–] Links/Done/Todo


This post explains what a QUICKIE USB-2-USB device is, and what I've managed to implement on Hasu's USB to USB keyboard converter using his TMK Keyboard Firmware Collection toolkit. If you're eager to get started before reading the details, you may jump directly to the Download and Install, Keymap Configuration and Device Flashing posts below.

    USB2USB-x3_YangDigi_GeekHack-Topic80421_GadOE.jpg?raw=1
    GeekHack user yangdigi's comparison of USB-2-USB devices: Arduino Leonardo-type, Hasu's device and his own Pro Micro device.
    Scale: Hasu's device is about 6 cm (2") long.

Look at those beauties, heh. I've decided to call this kind of device a QUICKIE (QWERTY USB In, Colemak Key Input Emulated)! ;-) More proper names are "USB-2-USB" or "USB to USB converter" device, as you may of course use it for non-Colemak layouts (and as my name is silly).

This non-OS-specific solution doesn't have the full power of layout installs, but it's very interesting. A USB-to-USB device that plugs between the keyboard and whatever you're connecting your keyboard to, provides an XKB/Win/Mac/what-have-you independent solution that can accommodate many of my tricks! For people having to deal with zealous IT security rules, this may be the only solution short of getting an expensive remappable keyboard. It could let you type Colemak+Extend to, say, a PlayStation or other device where you can't control the layout directly. It could let you pair code using Colemak+Extend while your mate uses QWERTY (poor thing!) on the same computer. And it could be fun to make one yourself if you're adventurous and DIY oriented!

The common solution is a microcontroller (such as Atmel's AtMega32 chips; Arduino Teensy 2+ or Pro Micro are good choices) with USB, coupled with a USB Host "shield" (separate little PCB) that lets you plug your keyboard into it. It'll mount itself as a HID keyboard, that is, a run-of-the-mill USB keyboard that almost any device accepts.

There are other options, too: You could have a PS/2-USB converter instead, or various keyboard controllers attached to or built into the keyboard itself! Most of these can use the same "Unimap" layout code, so if you're interested in one of those variants then check it out.

There are several possible ways of programming a USB-2-USB device. Essentially you have to:
1) Connect the device in Bootloader mode which means it can be programmed
2) Get some code and compile it for the device, or use a pre-compiled HEX file. There's even an online layout designer for a less techy option.
3) Flash the .hex file to the device's static memory
4) Reset the device (or just unplug and replug it) to reactivate application mode so it works

An advantage of my TMK-based implementation is that you can pick and choose most of the enhancements as modules:
• The AngleWide mods are keymap types so they work with any layout you choose, including QWERTY or Dvorak
• The Extend layers and switch keys are options that should work with nearly any existing layout
• The Curl(DH) mod for Colemak layouts uses a separate switch (together with CurlAngle keymaps)
• Mirrored Colemak and Tarmak (transitional Colemak) are separate layouts.
Freedom of choice through modularity is an ideal in the DreymaR world, as it is in Linux. :-)


[1]    Character/Key Mapping Layers

[1.1]    COLEMAK[eD] - EDITION DREYMAR

A USB-2-USB device remaps only key strokes, not character input events. So key mods like layout and ergo remappings are possible, but not mods that send glyphs. Your dead keys and AltGr mappings will work as they do without the device, and you may only move their keys around as they are.

Sorry, but AltGr/DeadKey glyph mappings such as the powerful Colemak[eD] below are for the most part up to the active layout on the machine you're typing to.

In all honesty though, it is possible to send Unicode with methods such as Windows' Alt+NumPad(####) defined for instance as TMK macros. But since it's platform dependent, memory consuming and clunky, I couldn't do this to create the full Colemak[eD]. Dead key tables and functions would've been even more byte-gobbling, so no.

However, I have made a user function that lets you define a few keys as four-level giving OS specific Unicode input using the RAlt key as AltGr for these keys only. I used this to get the Norwegian special letters åæø and their shifted counterparts (on the bracket and ISO LSGT keys) as in Colemak[eD], and it works fine for me. I even added the bullet and dagger glyphs (on the ISO \| key) for good measure. You can find various lists of alt codes to use, such as this one. Remember that you need to use "KC_P#" where # is the digit. For Mac or Unix you need to change the method, see the unimap_dreymar.c file and ask me if you need help.

    Cmk-ISO-eD-CurlAWide_96d-FShui.png
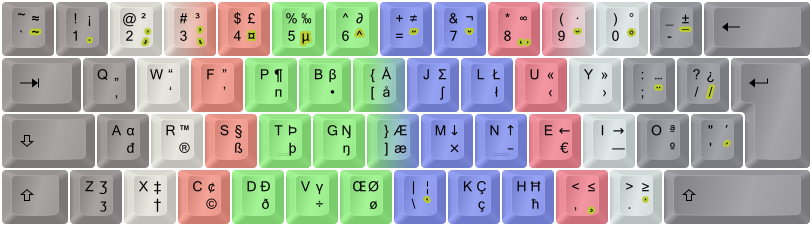
    Fig.: Colemak-CAW[eD], showing an ISO board with the Curl(DH)Angle and Wide ergonomic mods (see below).


[1.2]    EXTEND LAYERS

This is My Favorite Mod next to Colemak itself! The ability to navigate and edit from the home position and its immediate surroundings is extremely powerful. It's like having part of the power of advanced editors like Vim ready in all situations. Plus a fully functional multimedia keyboard without sacrificing compactness. And much more.

    Extend-ISO-NoMod-Win_96d.png?raw=1
    My Extend Nav/Edit mappings. Green, navigation; blue, mousing; orange, multimedia; gray, system/misc.

    Extend-ISO-NoMod-Ext2_96d.png?raw=1
    My Extend NumPad mappings. Green, navigation; purple, NumPad; sepia, symbols; gray, system/misc.

The USB-2-USB implementation is almost the same as the Linux/XKB and Windows/PKL ones. Some advanced media key codes such as Brightness controls are missing for now (as their key codes aren't in TMK). How some of the advanced keys like MouseWheel Left/Right are interpreted is still up to the OS.

Here's the Extend1 and Extend2 layer charts from my TMK source file:

Spoiler:
    DreymaR's Extend1 layer:
 * ,----.    ,-------------------. ,-------------------. ,-------------------.
 * |Caps|    |MPly|MPrv|MNxt|MStp| |Mute|VolD|VolU|MSel| |WHom|WSch|MyCm|Calc|
 * `----'    `-------------------' `-------------------' `-------------------'
 * ,-------------------------------------------------------------------------.
 * | ?? | F1 | F2 | F3 | F4 | F5 | F6 | F7 | F8 | F9 | F10| F11| F12|  Pause |
 * |-------------------------------------------------------------------------|
 * |      |Esc |Wh_U|WBak|WFwd|Ms_U|PgUp|Home| Up |End |Del |Esc |Ins |  App |
 * |-------------------------------------------------------------------------|
 * |*Ext1* |Alt |Wh_D|Shft|Ctrl|Ms_D|PgDn|Left|Down|Rght|BSpc|App |WFav|PScr |
 * |-------------------------------------------------------------------------|
 * |     |Wh_L| ^Z | ^X | ^C | ^V |Btn1|Btn2|Btn3|Ms_L|Ms_R|Wh_R|            |
 * |-------------------------------------------------------------------------|
 * |      |     |Ext1 |           Return            |     |     |     |      |
 * `-------------------------------------------------------------------------' 
    DreymaR's Extend2 layer:
 * ,----.    ,-------------------. ,-------------------. ,-------------------.
 * |    |    |MPau|MRwd|MFFd|Ejct| |WRef|BriD|BriU|Slep| |www |Mail|App3|App4|
 * `----'    `-------------------' `-------------------' `-------------------'
 * ,-------------------------------------------------------------------------.
 * | ?? | !  | @  | #  | $  | %  | ^  | P7 | P8 | P9 | P* | P- | =  |        |
 * |-------------------------------------------------------------------------|
 * |      |Home| Up |End |Del |Esc |PgUp| P4 | P5 | P6 | P+ | (  | )  |      |
 * |-------------------------------------------------------------------------|
 * |*Ext2* |Left|Down|Rght|BSpc|NLck|PgDn| P1 | P2 | P3 |PEnt| '  | ,  |     |
 * |-------------------------------------------------------------------------|
 * |     |    | ^Z | ^X | ^C | ^V |Btn1| :  | P0 | P0 | P. | P/ |            |
 * |-------------------------------------------------------------------------|
 * |      |     |     |                             |Ext2 |     |     |      |
 * `-------------------------------------------------------------------------' 

To use the Extend layers, define the CAPSBEHAVIOR constant to 1. This'll make CapsLock the Extend modifier. You may change it to another key by editing the active layout or keymap; see the Configuration post below.

There's a couple of EXT#BIT constants that determine how Extend2 is selected: If EXT2BIT is defined as MOD_BIT(KC_RSFT) for instance, holding Right Shift down while pressing the Extend key will activate Extend2. Holding down Extend alone will maintain that layer. The EXT3BIT and the combination of the two could select Extend3 and Extend4, but I haven't yet implemented these layers as I haven't yet decided on what to put in them. You could add your own if you want to – ask me how.

For the NumPad layer, remember that the NumLock state influences what you get. There's a NumLock key easily accessible in the layer.

NOTE: Superstacking Extend modifiers doesn't always work for me. Instead of Ctrl+Shift+Left, pressing Caps+S+T+N gave me ST key strokes. Oddly enough, it works with either Phys-Shift + Extend-Ctrl as well as Phys-RCtrl + Extend-Shift (Shift+Caps+T+N or RCtrl+Caps+S+N work) but not with physical LCtrl. This leads me to believe that the limitation is my keyboards' scan matrix, but it happened on all my boards. Other users didn't have this problem...?


[2]    Ergonomic Key Remappings
[2.1]    THE ANGLE/WIDE ERGONOMIC KEYBOARD MODEL MODS

These are ergonomic mods, moving some keys around to achieve straight wrists (the Angle mods), as well as better hand separation and right pinky load (the Wide mods). The Angle part is almost a no-brainer to me as it allows the left hand to keep a straight wrist without changing the fingering on ZXCV, and makes B easier to reach. Shai Coleman himself has given his "blessing" to this mod! The Wide mod is more optional, but it does put some load off the right-hand pinky, widen the arm distance (useful for small keyboards in particular, but nice regardless), and provide easier access to AltGr/Enter/Backspace/RShift.

    Cmk-ISO-AWide-35_60d_FShui.png?raw=1
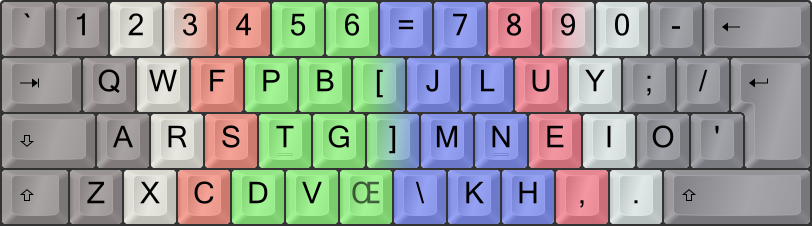
    The AngleWide(Slash) ergo mod for ISO keyboards.

I've implemented the ZXCVB_ 'Angle' shift for ISO keyboards both separately and as part of the AngleWide(Slash) mod that I use myself. For ANSI boards I've made an implementation of the 'Angle(Z)' shift (moving the Z key to the middle) and a Wide(Quote) mod as well as the combination of these. Also the 'A-Wing' mod to get the Angle and right pinky benefits without messing with the Z position (but at other costs).

     Cmk-ANSI-AWide-ZQu_60d_FShui.png?raw=1
     The Angle(Z)Wide ergo mod for US/ANSI keyboards

Colemak-DH requires by default a special Angle(Wide) variant in which the V is kept in its original position so that only ZXC and B move; B then gets remapped to D by the mod itself. See below.

To use one of these, define the Unimap layout constant in my keymap (.c) file:

 * Edit '_########' in the UNIMAPLAYOUT definiton below to choose ergonomic Curl/Angle/Wide keyboard mods:
 * _UNMODDED - Standard Unimap format for all keyboard and converter types (w/o F13-24; this one is without ergo mods)
 * _ISO__A__ (w/ Curl-DH: _ISO_CA__) - ISO/Int Angle (the simple lower left half-row shift)
 * _ISO__AW_ (w/ Curl-DH: _ISO_CAW_) - ISO/Int Angle-Wide(/)
 * _ISO_CAWS                         - ISO/Int Curl-Angle-Wide(/)-Sym (more accessible apostrophe and hyphen/minus)
 * _ANS__A__ (w/ Curl-DH: _ANS_CA__) - ANSI/US Angle(Z)
 * _ANS__AW_ (w/ Curl-DH: _ANS_CAW_) - ANSI/US Angle(Z)-Wide(')
 * _ANSAWING (   Curl-DH:  N/A     ) - ANSI/US A-Wing
 *
 * Select a Curl(DH) or non-Curl ergo model, or plain unmodded Unimap. For Curl(DH), you also need to set CURLMOD.
 * NOTE: These map layouts affect all layouts. So for instance the CAWS map will affect both Colemak and Extend.

The actual keymap types are defined in the header (.h) file as compiler macros and those are a bit harder to edit manually.


[2.2]    COLEMAK-DH ALIAS THE CURL ERGO MOD

The Colemak-DH ergo mod makes the home "row" curl like a relaxed hand does instead of forcing it to a straight line as was commonly thought best some years ago. This is achieved by moving the common D and H from their debated "middle trench" positions to the more comfortable lower-row V/M positions, while preserving the key-to-finger mappings of vanilla Colemak. Since Oct 2020, standard Colemak-DH is the original DH mod a.k.a. DHm.

    Cmk-ISO-CurlAWide_90d-FShui.png
    The Colemak Curl(DH)AngleWide, a.k.a. Colemak-CAW, ergo modded layout.

This mod depends on using a CurlAngle ergo mod which is easier on an "102/105-key" ISO keyboard but as seen above there are decent options for US/ANSI boards too.

To use Colemak-DH with my TMK files, there's a preprocessor switch named CURLMOD:

 * The CURLMOD options for Colemak and Tarmak layouts are:
 * 0: No Curl - vanilla Colemak/Tarmak
 * 1: The 2017 Curl(DHk) ergo mod, bringing the D and H keys down to comfortable bottom-row positions (QWERTY C/M)
 * 2: SteveP99's original Curl(DHm) ergo mod, bringing D/H down but M to the home row. DH standard since Oct 2020.
...
#define CURLMOD 1

This switch only affects Colemak layouts, including the four Tarmak layouts and Mirrored Colemak. Make sure you use a CurlAngle or CurlAngleWide keymap type such as UNIMAP_AWIZXCBV with it (optional for Tarmak1).


[2.3]    PLAYING WITH THE SYMS (Work-In-Progress)

The fairly optional "Sym" symbol key mod hasn't been fully implemented in my TMK files. There's a model for CAWS-ISO that may serve as a template if you want another variant. But note that models affect Extend layers and other layouts too! So you may be better off just editing the layout definitions directly instead.

  \   7   8   9   0   =
[   j   l   u   y   '   -
 ]   m   n   e   i   o   ;
   /   k   h   ,   .   _____

    The "Sym" symbol rotation mod together with the Curl-DH and AngleWide(ISO) mods is Colemak-CAWS.


[2.4]    MODIFIER MODNESS (Work-In-Progress)

I've implemented Sticky Shift but not much else for TMK. See the repo files/docs. Moving modifiers around shouldn't be hard to do if you're interested.


[3]    Layout Variants
[3.1]    THE TARMAK TRANSITIONAL COLEMAK LAYOUTS

There's a main forum topic on this that you may want to read. Basically, I've added four Tarmak layouts that provide stepping stones from the standard (US) English QWERTY layout to the Colemak[eD] layout by moving only 3-4 keys per step. Each step brings at least one important key to the home row (notably, E-T-R-O-I) and only the uncommon J is misplaced in the process.

    Tarmak_Spectral_ETROI.png?raw=1
    The 5-step Tarmak(ETROI) transitional Colemak layouts, spectrally color-coded from red (Tarmak1) to violet (Colemak).

The Tarmak progressions work modularly with the AngleWide ergo mods.

If you want to learn the brilliant Colemak-DH variant using a Tarmak progression, that's possible too! You just have to learn a CurlAngle mod before or with the 2nd Tarmak step which also gets tweaked a little so it moves B instead of G. The right-hand swaps (Hmk) should ideally be learnt in conjunction with Tarmak1-Curl because that moves K, but for SteveP's old variant I've deferred the HM swap to the last step. It could go wherever you like as it's separate, so feel free to edit the layout file if you desire.

     * Tarmak2 - Transitional Colemak (ET)
     * ,-----------------------------------------------------------.
     * |     |  q|  w|  F|  r|  G|  y|  u|  i|  o|  p|   |   |     |
     * |-----------------------------------------------------------|
     * |      |  a|  s|  d|  T| *J|  h|  N|  E|  l|  ;|   |        |
     * |-----------------------------------------------------------|
     * |        |  z|  x|  c|  v|  b|  K|  m|   |   |   |          |
     * `-----------------------------------------------------------'     

     * Tarmak2-Curl(DHk) - Transitional Colemak-Curl-DHk (ET)
     * ,-----------------------------------------------------------.
     * |     |  q|  w|  F|  r|  B|  y|  u|  i|  o|  p|   |   |     |
     * |-----------------------------------------------------------|
     * |      |  a|  s|  d|  T|  g|  K|  N|  E|  l|  ;|   |        |
     * |-----------------------------------------------------------|
     * |    |  z|  x|  c| *J|  v|  _|  M|  H|   |   |   |          |
     * `-----------------------------------------------------------'    
[3.2]    LOCALE AND PHONETIC VARIANTS

The QUICKIE only partially supports locales per se, as it only sends key strokes that are then re-coded by your computer's layout settings. My four-level Unicode function remedies this somewhat by allowing some keys to have their AltGr/RAlt states remapped to an OS dependent Unicode input method. So I can set a standard US QWERTY layout on my computer and still have, e.g., the locale ÆæØøÅå letters where I'm used to.

Before I made that function however, I used the locale layout installed on Windows. But I found that the default symbol key mappings are non-intuitive since they are quite different from the US ones which I'm used to now. So I've made a "hack" layout for myself that moves several symbol keys to where I feel they are better placed for me.

For instance, instead of a [=+] key as on US keyboards, the Norwegian locale has [+?], [0=] etc. I can't sort that out to get the symbol placements I'm used to as a Colemak[eD] typist unless I choose a US locale layout on the computer I'm on – but I still need the Norwegian ÆØÅ letters so that won't work! I had to settle for, e.g., moving the +? key to the US /? key position so at least the question mark is in the right place. Not perfect, but the best I could do.

Phonetic layouts for non-latin scripts require a layout with that script installed on the computer or whatever you're typing to. If you select a QWERTY phonetic layout for a script and have a USB-2-USB Colemak keymap active, your resulting layout will be Colemak phonetic. If, however, you want to swap some key positions (for Rulemak/Bulmak for instance), a suitable new keymap must be made and compiled.


[3.3]    MIRRORED COLEMAK

Advanced typing with only one hand is possible given a modicum of familiarity with the mirroring method. In fact, this paragraph was written entirely using the left hand with the exception of the mirroring key itself, with hardly any training! The brain is inherently good at mirroring things.

Mirrored layouts are easily implementable for the USB-2-USB device. I've provided a mirrored Colemak that obeys the Curl mod setting. This will usually be your second layout (layer 1) on top of Colemak, so in my map file it's set by using ACTIVELAYOUT 5 (Colemak) and SECONDLAYOUT 6 (mirrored Colemak).

If you want a non-Colemak mirrored layout, you're on your own writing one. If you do, please post it below so others can benefit! I haven't yet

       Mirrored Colemak (used as switch layout for one-handed typing)
     * ,---.   ,---------------. ,---------------. ,---------------.
     * |  \|   |F12|F11|F10|F9 | |F8 |F7 |F6 |F5 | |F4 |F3 |F2 |F1 |
     * `---'   `---------------' `---------------' `---------------'
     * ,-----------------------------------------------------------.
     * |BSp|  -|  0|  9|  8|  7|  6|  5|  4|  3|  2|  1|  =|     ` |
     * |-----------------------------------------------------------|
     * | Ent |  ;|  Y|  U|  L|  J|  G|  P|  F|  W|  Q|Esc|Cps|   \ |
     * |-----------------------------------------------------------|
     * |    ' |  O|  I|  E|  N|  H|  D|  T|  S|  R|  A|  '|  Enter |
     * |-----------------------------------------------------------|
     * | Shift  |  /|  .|  ,|  M|  K|  B|  V|  C|  X|  Z|    Shift |
     * `-----------------------------------------------------------'     

You'll want an easily accessible key (such as a thumb key) to switch between normal and mirrored typing. One suggestion is using LAlt for left-handed typing, and RAlt or RWin for right-handed typing. But you may instead use a foot switch set to any other key, or a "ghetto foot switch" made by stripping most keys off a keyboard and placing it on the floor, for instance. A more fancy but still cheap foot switch could be made by soldering the wires from a foot pedal switch (if you have something useable) to the contacts of a key on a cheap keyboard. By default, the layer switch key in my files is Pause/Break which could be cannibalized this way.

Then, you may choose whether the switch key should be a normal Shift-type (switch) or a Caps-type (toggle) modifier. See how I've defined the "FPau" Fn key in my file; it's used as my definition for the Pause key but you can copy that to any other key as well. The normal way would be to set FPau to Shift/switch-type with "ACTION_LAYER_MOMENTARY(1)" (the 'PAUSBEHAVIOR 2' setting), and then replace the desired key in your active (layer0) layout with FPau if you wish to move it. If you go with a toggle modifier, you need to make that key transparent (TRNS) on the mirrored layout, or provide a similar toggle somewhere else or you won't be able to get back!

Tip: Sticky Shift and Ctrl could be useful for one-handed typing! See the STICKYMODS setting.


[4]    Download and Setup
[4.1]    DOWNLOAD AND INSTALL

There's a separate Download and Install post below. It shows how to get and install my files, and also how to prepare the device in bootloader mode.

[4.2]    KEYMAP CONFIGURATION

There's a separate Keymap Configuration post below. It shows how to get or tweak/make a HEX file that suits your layout needs.

[4.3]    DEVICE FLASHING

There's a separate Device Flashing post below. It shows how to load a HEX file into your USB-2-USB device and get it ready for typing.


[4.4]    HARDWARE IMPLEMENTATIONS

I won't cover all possibilities here. I use Hasu's converters myself and haven't got any experience with others, but the possibilities are many.

A Pro Micro (such as the one seen above by GeekHack user Yangdigi) may be cheapest, but it also seems to be the most techy option?

Colemak forum user Darkness made a device and his own code for it, see his "Arduino-based hardware keyboard remapper" topic for more info. Scroll down that page for pictures and a nice how-to sum-up post. He started off with an Arduino Leonardo like the one to the left in Yangdigi's image above; this can be a good development platform if you have one. But for a more useful implementation, he uses an Arduino Teensy 2.0 as seen below. Hasu has tried his TMK code on this device and it seems to be working fine.

    USB2USB_DarkyToothpaste_Teensy.JPG?raw=1
    Darkness's Teensy-based USB-2-USB Converter (see his topic)

I'm really hoping that the upcoming Teensy 3.5/3.6 can be used for TMK! These devices are fast, have a lot more Flash/RAM (512/192 kB for 3.5; 1024/256 kB for 3.6) and most importantly, come with a second USB intended for Host mode so it won't need a separate USB host! That may make it a cheap and powerful option; someone will hopefully test this soon.

The safest and easiest option may be to order the brilliant USB to USB Converter from GeekHack user Hasu, who has also developed the TMK software for converting keyboards to more awesome keyboards. (Hasu's device is also available from 1UpKeyboards which has a web shop but at a higher price from what I can see.) I've got a few of these beauties, and my code, instructions and .hex definition files below are based on Hasu's device although they may be used for other devices too (may need some geeky tweaking).

    USB2USB_Hasu-NJBair_GeekHack-topic74708_GadOE.jpg?raw=1
    Hasu's USB to USB Converter for TMK Key mapping (original photo by Nick J Bair)

    PS2USB_Hasu_GadOE.png?raw=1
    Oh look, Hasu has other converters and keyboard controllers too! Here's a PS/2-to-USB converter making my friend's vintage IBM Model M board awesome.


This topic won't show you any more about how to get your own QUICKIE USB-2-USB device. From my own experience I can heartily recommend Hasu's products, but find out what works for you. Best of luck, either way!


LINKS:

@GeekHack:
Hasu's USB to USB converter topic and Hasu's converter buying topic
Hasu's TMK topic (code basis for keyboard controllers/converters in general)
NJBair's review of Hasu's USB-2-USB converter, with a nice FLIP guide
YangDigi's Pro Micro DIY converter topic (some Teensy info too)

@GitHub:
Hasu's GitHub TMK repository, and its USB-2-USB section
Hasu's Build FAQ, Build README and keymap README
NJBair's repository including some build/flash info
Hasu's TMK Keyboard Wiki with much useful info

@TMK_site:
Hasu's Online TMK Keymap Editor for the USB to USB converter

@Colemak:
Darkness' Arduino-based hardware keyboard remapper topic

@QMK:
QMK (Quantum Mechanical Keyboard) is a TMK-fork-gone-solo that deserves honorable mention
The GitHub QMK repository  (I don't use QMK myself, but it has a lot of documentation and more)


DONE:

• Now witness the typing power of this fully operational USB-2-USB device! Happy hacking, brave and adventurous souls! ;-)
• 2018-01: Added a user function that allows for input of Unicode glyphs not in the layout using the AltGr(RAlt) modifier.
• 2018-02: More advanced modifiers for Extend2+. Hold down, e.g., RShift then Caps (then release RShift) for Extend2. Can't use Alt keys (yet) on Win.


TODO:

• Extend modifiers don't always stack? Caps+S+T+N didn't produce Ctrl+Shift+Left but ST keystrokes for me once; others have had no such problems.
• Extend3–4? Would it be possible to implement some shortstrings at least? Memory limitations may preclude this for now.
• Use the ScrollLock LED to show whether the second layout is active?


    Cmk-CAW_Unicomp_DreymaR_TN-Ninja_2017-08.png?raw=1
    My Unicomp SpaceSaver Buckling Spring (IBM Model M ISO type) keyboard with "American/Ninja" caps, splendidly sporting the Colemak-CAW layout.

Last edited by DreymaR (09-Jun-2021 12:05:14)

*** Learn Colemak in 2–5 steps with Tarmak! ***
*** Check out my Big Bag of Keyboard Tricks for Win/Linux/TMK... ***

Offline
  • 1
  • Reputation: 210
  • From: Viken, Norway
  • Registered: 13-Dec-2006
  • Posts: 5,343
[4.1]    DOWNLOAD AND INSTALL

First off: Here are my TMK-based files on GitHub! There's:
• A BigBagKbdTrix_TMK dir with my files; it can go into or beside the tmk_keyboard/ dir of Hasu's repo
• A MakeFlash shell script (see below) that'll install and run TMK with my files under Linux
• A _myhexfiles dir with some ready-made HEX files that you can flash directly onto a Hasu device (or any other ATmega32U4 chip)

In addition to providing my additional files for use with Hasu's TMK code for his USB to USB converter, this post shows how to prepare your device and get ready to make and flash (install) a HEX file to it. If you have another device or just wish to learn more, I recommend looking at the TMK help files and NJBair's instructive firmware building/flashing guide.

The Keymap Configuration post below will show you how to get or generate a keymap/layout that suits you, and the Device Flashing post shows how to program a USB2USB or other TMK device with that file.


Device preparation:

1. For flashing on Windows: Install Atmel's FLIP application for device drivers ++
        • Note that it says 'Buy now' on a button but the links below don't cost anything!
        • I've had trouble with FLIP not finding a Java Virtual Machine after a Java update; you may have to reinstall your Java Runtime Environment.

2. Insert the device and press its Bootloader mode button (fig. 1–4).
        • You don't need a keyboard plugged into the device yet. In fact, to be on the safe side, I recommend not plugging in a keyboard yet!
        • When in Application/Keyboard mode, the yellow App LED should be lit; when in Bootloader/Flash mode it goes out.

    USB2USB_Hasu-physical.png?raw=1
    Fig. 1: Hasu's USB-2-USB device. 1) USB host – plug keyboard here; 2) USB client – plug into computer or whatever; 3) App LED; 4) Bootloader button

3a. For flashing on Windows: Install/update the device drivers for your ATmega32U4 (or other) chip.
        • The Windows Device Manager shows your device first as a HID keyboard and then, in Bootloader mode, as an Atmel or ATMega USB device
        • Point the driver update to the C:\Program Files (x86)\Atmel\Flip 3.4.7\usb or similar directory if necessary
        • Now, using the Windows Device Manager you can check that the device is mounted:

    USB2USB_WinDevMgr_Hasu-ApplicationVsBootloaderMode.png?raw=1
    Fig. 2: Windows Device Manager showing the Hasu USB-2-USB device in Application/Keyboard (left) and Bootloader (right) mode.

3b. For flashing on Linux: Ensure that your device is seen by the OS, in DFU (bootloader) mode.
        • The lsusb command lists attached USB devices; hopefully there's an entry with Atmel and "AVR DFU Bootloader" in it.
        • If you're using a Linux virtual machine, make sure the device is captured in Bootloader mode, using your VM app's device listings.
        • Every time you enter or leave bootloader mode, you may have to recapture the device for your VM.
        • It should be ticked off in the Devices>USB menu on VirtualBox for instance; similarly for VMWare and others:

    USB2USB_VBox-DevicesMenu_Hasu-BootloaderMode.png?raw=1
    Fig. 4: The Devices (pop-up) menu of VirtualBox, showing a properly captured Atmel USB device.


Getting and installing my TMK files, TMK itself and AVR tools for Linux:

My files are extensions of Hasu's TMK code. You'll need to compile them within a copy of his repo, and I'll describe how to do this on a Linux machine. You can use a real or virtual Linux machine; I've used an Ubuntu VM. If you have an updated 64-bit Windows 10, you can even use the Linux Subsystem BASH command line to do it without leaving Windows – see below! I guess you could also use for instance CygWin or MinGW, but I haven't tried those possibilities.

Included in my files is the shell script makeflash_dreymar_tmk.sh that does several things on a Linux machine. Run it with the -h option for more help:
    USB2USB_Linux-MakeFlash-help.png?raw=1
    Fig. 3: The help text for my MakeFlash script, showing options and default values. This image may be outdated; run the script yourself.


Step-by-step instructions for installing on Linux:

Here's a set of step-by-step download/install instructions:
1) Download or clone my repo and...
        • if installing TMK, put its directory with at least the MakeFlash script in the dir in which you want TMK.
        • My files/dirs can actually go either a) in a dir beside TMK's tmk_keyboard, b) directly inside it, or c) in a dir inside it
        • (On my virtual machine, I use a shared folder so both Linux and Windows can see the HEX files I've built directly.)
2) Install the AVR Tools needed for compiling for and flashing to the chip with bash makeflash_tmk_dreymar.sh -a
3) Install Git & Hasu's GitHub TMK repository with bash makeflash_dreymar_tmk.sh -g (if you have Git/TMK already, it'll update them)
4) Make sure my repo is in place relative to the TMK one as described above, and open a terminal there
5) Now you're ready to Build and flash HEX files from TMK code. To simply build the default keymap as set in keymap_dreymar.c, use:

$> ./makeflash_dreymar_tmk.sh

See the Keymap Configuration post below for more info on getting a HEX file that suits you, and the Device Flashing post for how to program your device with the HEX file.


Addendum: Using BASH on Windows through the Linux Subsystem

The Windows 10 Anniversary Edition (64-bit) has an exciting addition that's nominally still in beta but already quite operational (command-line only): A Ubuntu GNU/Linux "Subsystem" running a BASH command line terminal! This is capable of compiling the TMK code just like a Linux machine. I've heard you cannot flash to a device with it, as dfu-programmer isn't working (yet) – but that's no biggie as you can just use Windows-based flashing tools. Anyway, just try and see if it works now; let me know if it does!

Hasu has instructions on how to use BASH on Windows 10 for TMK compiling, but here's a little run-through:

• Make sure you have the Windows 10(64bit) Anniversary Update or newer; if you don't then get it from Microsoft's pages.
    Settings → System → About; your WIndows version should be >1607.
• Activate Developer Mode
    Settings → Update & Security → For developers → Developer mode
• Activate Windows Subsystem for Linux
    Control Panel → Programs → Turn Windows features on or off → Windows Subsystem for Linux (beta) (requires a restart)
• Start the BASH terminal
    Start Menu → Bash on Ubuntu on Windows; you'll have to finish the Ubuntu install and choose a username/pwd the first time.
• Navigate to a suitable folder and follow the step-by-step procedure above to install AVR tools, make, git and TMK and get going!
    At /mnt/c/ you'll find the C:\ drive; you have access to the same file system as Windows does.
• If you have my files in a different location from the main tmk ones, you can use a symbolic link to make my script see the tmk dir.


Addendum: Using other keyboard converters/controllers

The above should work directly for any ATmega32U4-based controllers. TMK works for several types of keyboard controllers and converters; look inside the TMK dirs for more info. The map files I use now are in the Unimap format, which should work with all TMK compatible controllers.

I've tested Hasu's PS/2-USB converter. For that device, be aware of the following:
• This converter uses the ATmega32U2 chip (for now). If flashing with FLIP, set its device selection accordingly.
• To compile for the PS/2-USB converter with my script, use the following switches:

$> ./makeflash_dreymar_tmk.sh -d converter/ps2_usb/ -m Makefile.unimap.rev2
Last edited by DreymaR (25-Jun-2018 21:11:06)

*** Learn Colemak in 2–5 steps with Tarmak! ***
*** Check out my Big Bag of Keyboard Tricks for Win/Linux/TMK... ***

Offline
  • 0
  • Reputation: 210
  • From: Viken, Norway
  • Registered: 13-Dec-2006
  • Posts: 5,343
[4.2]    KEYMAP CONFIGURATION

This post shows how to get the keymap HEX file you want. How to compile TMK or other code is described here.

If you wish to delve deeply into keymap editing, make sure you've read at least Hasu's Keymap and Layers ReadMe. It and other docs are found in the tmk_keyboard/tmk_core/doc dir of his GitHub repo.


Using a precompiled HEX file:

I've provided some .hex files with my download, but I can't make every combination of options as that'd take a lot of my time. If you're lucky, you'll find what you need and then you don't have to build your own HEX file. There may be other such files available from other sources, too.

My provided pre-compiled HEX files are:
QWE-Tarmak-Cmk_All_Extend: A full progression from QWERTY via Tarmak 1–4 to Colemak, with Extend, without any ergonomic mods ("vanilla").
QWE-Tarmak-Cmk_CurlAWideISO_Extend: A full Tarmak progression as above, with Extend and the Curl(DH)AngleWide-ISO ergo mods.

So you could use these files to:
• Learn Colemak or Colemak-CAW with as many Tarmak steps as you like (0–4),
• Type Tarmak#, Colemak or Colemak-CAW with Extend, or just
• Type QWERTY with Extend and optionally the AngleWide-ISO ergo mod (the Curl mod does not apply to QWERTY)

If you find a ready-made HEX file, make sure it's built for the right chip. The Hasu USB-2-USB device currently uses Atmel ATmega32U4.


Using Hasu's online editor to generate a HEX file:

Hasu's Online TMK Keymap Editor for the USB to USB converter will let you make .hex files you can save and use for flashing your ATmega32U4 device. If you need a simple keymap that I haven't made already, this may be the easiest way of getting it.

    USB2USB_Hasu-TMK-WebEditor_L0-L1_70pc.png?raw=1
    Fig.: Hasu's Online keymap editor, showing two different layers and key panels.

You can make up to 7 layers with this, only by clicking the keys you want into place. The NO code deactivates a key, and the TRNS code lets whatever is in active lower layers "shine through". There's a tab of layer switching functions too. Just mess around with it, it's fun.

To make modified key strokes and other fancy stuff, there's a Code Edit tab. To understand it, read Hasu's TMK Keymap guide.

You can also output C/JSON/etc code that you may compile manually for other devices, but you can't easily use that code for tweaking layouts, since it'll only give you hex codes for all the keys so unless you happen to know the right numbers you'll get a big headache trying to figure that out.

Here's an online editor example if you want a quick Big Bag starting point: My Colemak-CAW layout with two Extend layers. You can also import one of the precompiled HEX files into it if you want.

Note: There's also an older version of the online editor, but that didn't support modified keys.


Building a HEX file from TMK files on Linux:

If you've followed the Download and Install post above, by now you should have a copy of Hasu's TMK repo with my usb_usb files inside its converter/usb_usb directory and a terminal open to that directory.

In addition to installing, my shell script makeflash_dreymar_tmk.sh run in Linux can:
Build a HEX file (default name is usb_usb_unimap.hex) for flashing to your device, using Hasu's Makefile
Flash a HEX file to a device in Bootloader mode (or you may take the file to Windows and do it with Atmel FLIP instead)
Clean up all the files from a build/compilation; note that this also removes the .hex file unless you've renamed or moved it

Run it with a keymap file's name (unimap_<name>.c) to optionally choose a non-default keymap file (the default is 'dreymar'):

$> bash makeflash_dreymar_tmk.sh [<name>]

If you run the script with -h, you'll see the default values for which directory to use and what the file will be called etc. For an example, see the Install post above.


Editing my (or other) TMK keymap files:

I've provided a unimap_dreymar.c file with several keymaps/layouts in, and a unimap_dreymar.h file that mostly holds keymap types for the Angle/Wide ergo mods. For normal purposes, the unimap_dreymar.c file will be the one you want to edit to get the layout(s) you want. Use any editor (as long as it preserves character encoding) to edit the file in your local tmk_keyboard/converter/usb_usb directory before building the HEX file as described above.

The default layer is layer0; this will always be active when the device is activated. I've used layer1 for a second layout and added a layer-toggle key (ScrollLock by default) to go back and forth between two layouts. Layer2+ are intended for Extend layers but only layers 2–3 are in use for now.

The layout options are chosen with preprocessor directives; you can edit the values of the #define <OPTION> <value> lines before compiling to produce different .hex files as you like.

"Physical" keymap type settings (Angle/Wide ergo mods) in unimap_dreymar.c; see below if you want to edit these in unimap_dreymar.h:

/* Edit '_########' in the UNIMAPLAYOUT definiton below to choose ergonomic Curl/Angle/Wide keyboard mods:
 * _UNMODDED - Standard Unimap format for all keyboard and converter types (w/o F13-24; this one is without ergo mods)
 * _ISO__A__ (w/ Curl-DH: _ISO_CA__) - ISO/Int Angle (the simple lower left half-row shift)
 * _ISO__AW_ (w/ Curl-DH: _ISO_CAW_) - ISO/Int Angle-Wide(/)
 * _ISO_CAWS                         - ISO/Int Curl-Angle-Wide(/)-Sym (more accessible apostrophe and hyphen/minus)
 * _ANS__A__ (w/ Curl-DH: _ANS_CA__) - ANSI/US Angle(Z)
 * _ANS__AW_ (w/ Curl-DH: _ANS_CAW_) - ANSI/US Angle(Z)-Wide(')
 * _ANSAWING (   Curl-DH:  N/A     ) - ANSI/US A-Wing
 *
 * Select a Curl(DH) or non-Curl ergo model, or plain unmodded Unimap. For Curl(DH), you also need to set CURLMOD.
 * NOTE: These map layouts affect all layouts. So for instance the CAWS map will affect both Colemak and Extend.
 *      The Sym mod would work fine with QWERTY since Colemak uses QWERTY symbol keys, but not with, e.g., Dvorak.
 * To get my favoured Colemak-CAW (CurlAngleWide) layout on ISO/ANSI, use the _###_CAW_ map with
 *      ACTIVELAYOUT 5 and CURLMOD 2 settings below. Oh, and CAPSBEHAVIOR 1 for Extend, of course! ^_^
 */
#define UNIMAPLAYOUT(...)   UNIMAP_ANS_CAW_( __VA_ARGS__ )  /* CurlAngleWide-ANSI ergo model */

For layouts and layout options, the directives will select which pieces of code below to actually compile so you get what you want.

Active/default layout settings:

/* Define the ACTIVELAYOUT (and CURLMOD) constant(s) to choose the layer0 layout:
 * 0  : QWERTY
 * 1-#: Tarmak1 - transitional Colemak (supports CURLMOD; see below)
 * 2-#: Tarmak2 - transitional Colemak (--"--)
 * 3-#: Tarmak3 - transitional Colemak (--"--)
 * 4-#: Tarmak4 - transitional Colemak (--"--)
 * 5-0: Colemak
 * 5-1: Colemak Curl-DH (requires a CurlAngle keymap; see above)
 * 6-#: Mirrored Colemak (normally used as second layout with a layer switch)
 * 7  : Dvorak
 * 8  : Workman (but don't use that - Colemak Curl-DH is a _lot_ better!)
 */
#define ACTIVELAYOUT    5   /* LAY_COLEMAK      */

Second/switch layout settings:

/* Define the SECONDLAYOUT (and CURLMOD) constant(s) to choose the layer1 switch layout:
 * 0  : Unmodded QWERTY is the default; otherwise:
 * 1  : QWERTY with any active ergo mods (AngleWide etc)
 * 2-#: Colemak (if you want something else, replace it in the code between the 'REPLACE THE SECOND LAYOUT...' lines)
 * 3-#: Colemak Mirrored as second layout for one-handed typing (needs an accessible switch key!)
 *      NOTE: The "FPau" key is a layer1 toggle or switch (select which below), normally used on the Pause key.
 *            You may swap, e.g., LALT, RGUI or another key with "FPau" in your active layout to use that key instead.
 */
# define SECONDLAYOUT   0   /* SEC_VANQWERTY    */

Curl(DH)-mod settings:

/* The CURLMOD options for Colemak and Tarmak layouts are:
 * 0: No Curl - vanilla Colemak/Tarmak
 * 1: The 2017 Curl(DHk) ergo mod, bringing the D and H keys down to comfortable bottom-row positions (QWERTY C/M)
 * 2: SteveP99's original Curl(DHm) ergo mod, bringing D/H down but M to the home row. DH standard since Oct 2020.
 *    Some row-staggered board users may like the DHk variant, but the DH(m) standard is good for all board types.
 * N/A: DreymaR's old Curl(DvH) mod, bringing DH center-down to the QWERTY V/N keys (edit the layouts for this)
 *
 * NOTE: On the first Tarmak step, CURLMOD 1 will include the HMK swaps whereas CURLMOD 2 won't. So you can choose.
 *       For a baby Tarmak1 step, use CURLMOD 2 and then 1. The K will be misplaced at first, but it's rare.
 *       (For the other steps, CURLMOD 2 still doesn't move HM so Curl(DHm) users can do HM in the last step.)
 * NOTE: Another baby step after Tarmak1 could be transitioning to a CurlAngle(Wide) keymap model before Tarmak2.
 * NOTE: You could use a non-Curl UNIMAP_# for a Curl(DH) mod, to keep ZXCV together as in my old Curl(DbgHk) mod.
 */
# define CURLMOD        2   /* CURL_DH          */

CapsLock behavior settings, including Extend mode:

/* The CAPSBEHAVIOR constant chooses Caps key action, including the powerful Extend layer switch:
 * 0: CapsLock (unchanged)
 * 1: Extend modifier (uses a little more layout memory, but it's by far the most powerful option IMNSHO!)
 * 2: BackSpace (for vanilla Colemak or otherwise; a decent choice but Extend is better!)
 * 3: LCtrl
 * 4: Esc
 */
#define CAPSBEHAVIOR    1   /* CAPS_EXTEND      */

/* The EXT#BIT constants with the main Extend key (Caps by default) select Extend# layers in the EXTENDER user function:
 * Ext1 on Caps alone       : Navigation/editing/multimedia
 * Ext2 on Ext2+Caps        : NumPad/Navigation
 */
#define EXT2BIT MOD_BIT(KC_RSFT)                                    /*  Ext2+Ext selects Extend2    */

Sticky mods (Shift and/or Ctrl) settings:

/* The STICKYMODS constant chooses LShift, RShift and RCtrl key behavior (I chose to leave LCtrl alone):
 * 0: Normal Shift/Ctrl (default)
 * 1: Sticky Shift only
 * 2: Sticky Ctrl only
 * 3: Sticky Shift & Ctrl
 * NOTE: In the unimap_dreymar.h file, some relevant constants normally set in config.h are (re)set:
 *       - TAPPING_TERM is the max time a key may be held down for it to register as tapped
 *       - ONESHOT_TIMEOUT is the max delay before a oneshot modifier is ignored
 */
#define STICKYMODS      1   /* STICKY_SHFT      */

ScrollLock and Pause/Break behavior settings:

/* The SCLKBEHAVIOR constant chooses ScrollLock key action:
 * 0: Normal ScrollLock (default)
 * 1: Layer 1 toggle key (toggles the second layout)
 * 2: Layer 1 switch key (layer shift; e.g., for mirrored typing if you can use it as "ghetto" foot switch)
 */
#define SLCKBEHAVIOR    1   /* SLCK_L1TOGGLE    */

/* The PAUSBEHAVIOR constant chooses Pause/Break key action:
 * 0: Normal Pause/Break (default)
 * 1: Win/GUI key (useful for 101/104-key boards that have no GUI key)
 */
#define PAUSBEHAVIOR    0   /* PAUS_PAUS        */

Editing maps and headers manually:
It is of course entirely possible to edit the layouts themselves directly. It should be fairly intuitive how to do that. See the TMK keycode.txt file for a list of all key codes (layouts use the 3–4 letter versions).

CapsLock, LAlt, RAlt and some other keys are defined as Fn## keys in the layouts. At the start of the file there's a bunch of action definitions for these.

Below are some examples from an unimap file:

#  define AC_FTab ACTION_LAYER_TAP_KEY(2, KC_TAB)    // FTab (Tab key)  as Ext2 – tap for Tab (for now)
#  define AC_FnLA ACTION_KEY(KC_LALT)                // FnLA (LAlt key) as usual (for now)
#  define AC_FnRA ACTION_KEY(KC_RALT)                // FnRA (RAlt key) as usual (for now)
//#  define AC_FnU1 ACTION_MODS_KEY(MOD_LGUI, KC_T)    // FnU1 (`) as Win+T
#  define AC_FnU1 ACTION_MACRO(TYPESTR1)             // FnU1 as user macro: Type a string

In the above:
• FTab, mapped to the Tab key (TAB) in my layouts, activates layer 2 (Ext2) while held down, and sends the TAB key code if tapped.
    – The Tab key is quite handy as a dual-role modifier, but unfortunately it loses its repeat functionality this way.
    – ISO keyboard users might want to use the <LSGT> key instead; its code is NUBS ("Non-US Backslash").
• FnLA and FnRA, similarly, are my versions of the LAlt and RAlt keys. But for now, their defined actions are mostly to be their normal selves!
• AC_FnU1 is a user macro key that I put on Extend+Tilde/Grave. It's macro is defined at the end of the file; in this case it types out a boilerplate text (my email footer).
• Commented out above, is an alternative definition for FnU1: Sending a LWin+T keystroke instead (in Windows, this brings you to the menu line).

Here's an ergo remapping from the unimap_dreymar.h file; this one's (the lower part of) the UNIMAP_ANIZXCVB Angle-ISO mod. Note how ZXCVB have moved:

    ESC_,    FK01,FK02,FK03,FK04,   FK05,FK06,FK07,FK08,   FK09,FK10,FK11,FK12,   PSCR,SCLK,PAUS,        VOLD,VOLU,MUTE,  \
    GRV_,N1_1,N2_2,N3_3,N4_4,N5_5,N6_6,N7_7,N8_8,N9_9,Na_0,NbMN,NcEQ,JYEN,BSPC,   INS_,HOME,PGUP,   NLCK,KPDV,KPMU,KPMN,  \
    TAB_  ,U1_Q,U2_W,U3_E,U4_R,U5_T,U6_Y,U7_U,U8_I,U9_O,Ua_P,UbLB,UcRB,   BSLS,   DEL_,END_,PGDN,   KP_7,KP_8,KP_9,KPAD,  \
    CAPS   ,H1_A,H2_S,H3_D,H4_F,H5_G,H6_H,H7_J,H8_K,H9_L,HaSC,HbQU,HcHS,  ENT_,                     KP_4,KP_5,KP_6,KPCM,  \
    LSFT ,L1_Z,L2_X,L3_C,L4_V,L5_B,L0LG,L6_N,L7_M,L8CM,L9DT,LaSL,JROM,    RSFT,        _UP_,        KP_1,KP_2,KP_3,KPEN,  \
    LCTL ,LGUI,LALT,JMHE,         SPC_         ,JHEN,JKAN,RALT,RGUI,APP_, RCTL,   LEFT,DOWN,RGHT,   KP_0     ,KPDT,KPEQ   \
Last edited by DreymaR (16-Nov-2020 13:19:36)

*** Learn Colemak in 2–5 steps with Tarmak! ***
*** Check out my Big Bag of Keyboard Tricks for Win/Linux/TMK... ***

Offline
  • 0
  • Reputation: 210
  • From: Viken, Norway
  • Registered: 13-Dec-2006
  • Posts: 5,343
[4.3]    DEVICE FLASHING

This post shows how to flash your HEX file to a USB-2-USB device and get it ready for typing. See the above posts for how to prepare the device and get the HEX file you want.

NOTE: Flashing with a keyboard plugged into the device may be safe in most cases. But I got trouble with one keyboard (IBM/Unicomp Model M) after using FLIP for flashing with it inserted; it seems like the drivers or registry entry got corrupted somehow because now it won't mount on that PC anymore even though it's quite okay on other machines. Be warned.


Flashing the device with Linux:

My script run with the -f option flashes the generated HEX file to a connected device using DFU-Programmer; if you've already made the .hex file use -b to skip rebuilding it. If you want to flash without using my script, you could use the 'make dfu' command inside the usb_usb directory, or look inside the script to see how I did it.

According to the TMK wiki build FAQ, you'll need admin/sudo rights for the 'dfu-programmer' command (there's a workaround using udev rules, but it's a bit techy). I've tried flashing without sudo and it worked for me in one case but not another. If you do need sudo, run makeflash like this:

$> sudo ./makeflash_dreymar_tmk.sh -bf

NOTE: You do not generally want to build your files as root! Then you'll be in trouble if you try to clean up as non-root afterwards. So run MakeFlash twice, once with normal privileges to build your .hex file and the other time with -b (to not build again) and -f (to flash) with sudo/root privileges.

If you're using BASH on Windows 10 (beta), dfu-programmer won't work yet, due to a problem with mounting USB devices in general (libusb). Use Windows native tools instead, such as FLIP or dfu-programmer for Windows.

If you have another device, you may need some other method and more tools. As mentioned at the start of this post, there are helpful help files you may consult for this.


Flashing the device with Atmel FLIP on Windows:

You can use Atmel FLIP on Windows instead of flashing under Linux: It gives you more feedback and intuitive control with the process. If you compiled your HEX file on Linux you must make it available for the Windows file system to use Windows FLIP. I just put the whole TMK repository in a shared folder that both Windows and my virtual Linux machine can see; you could also move it on a USB drive or copy-paste from a Virtual Machine if your VM settings allow this.

1. Select the right chip (fig 5–1). For the Hasu device, it's ATmega32U4. Verify the chip type (fig 5–a).
2. Connect to the device in Bootloader mode. Select USB connection (fig 5–2) then Open. Verify the connection (fig 5–c).
3. Load a HEX file (fig 5–3). Use shared folders, a USB disk or some other way of accessing the file with Windows.
                 Verify for ATmega32U4 which only has 32kB memory minus 4 kB bootloader, that the file size is below 28480 bytes (fig 5–b).
4. Flash the device (fig 5–4). Make sure all options are on as shown, then press "Run".
5. Activate the device (fig 5–5). Press "Start Application". Reset should be checked.
6. Test the device. With a keyboard connected to the device, type something on it and see that it does what it should.

    USB2USB_AtmelFlip_Hasu.png?dl=1
    Fig. 5: Atmel FLIP for Windows. 1) Select chip (a); 2) Connect (c); 3) Load HEX file (b); 4) Flash device; 5) Start device

Last edited by DreymaR (25-Jun-2018 21:13:20)

*** Learn Colemak in 2–5 steps with Tarmak! ***
*** Check out my Big Bag of Keyboard Tricks for Win/Linux/TMK... ***

Offline
  • 0
  • Reputation: 4
  • Registered: 04-Feb-2010
  • Posts: 149

... O... M... G!!!

This is perhaps the single most impressive thing I have ever seen on this, or any other keyboard site. Granted it is made up of a bunch of things I've seen before, but the effort you put into making a cohesive whole, the completeness of the documentation, the polish of the presentation... it blows me away.

Hats off to you. Amazing job.

Last edited by cevgar (07-Aug-2016 15:21:01)
Offline
  • 1
  • Reputation: 210
  • From: Viken, Norway
  • Registered: 13-Dec-2006
  • Posts: 5,343

You noticed! *squee* ;-)

UPDATE: I got flashing under Linux to work, and updated the flashing section accordingly. Yay.

(The trick was capturing the device properly in my VM, and not using '--force' with dfu-programmer as the TMK FAQ stated. However, newer dfu-programmer versions need '--force'; I've made the script version aware.)

Last edited by DreymaR (12-Aug-2016 11:42:38)

*** Learn Colemak in 2–5 steps with Tarmak! ***
*** Check out my Big Bag of Keyboard Tricks for Win/Linux/TMK... ***

Offline
  • 0
  • Reputation: 0
  • Registered: 04-Nov-2011
  • Posts: 90

@DreymaR

Nice work. :D

I gotta get or build one.

Debian GNU/Linux Jessie NitroType TypeTest

Offline
  • 0
  • Reputation: 210
  • From: Viken, Norway
  • Registered: 13-Dec-2006
  • Posts: 5,343

Best of luck, penguin!

I'm going to install the Windows 10 Anniversary Edition next, to compile using BASH for Windows. That'll be awesome. Hasu has already done it and it works; you can't flash directly with dfu-programmer from BASH but that's a small matter since you can use FLIP in Windows and the files will be on the same file system.

*** Learn Colemak in 2–5 steps with Tarmak! ***
*** Check out my Big Bag of Keyboard Tricks for Win/Linux/TMK... ***

Offline
  • 0
  • Reputation: 210
  • From: Viken, Norway
  • Registered: 13-Dec-2006
  • Posts: 5,343
UPDATE: Hasu has upgraded his Online Editor for USB-to-USB layouts!

It's a nice update because the editor now supports modified key strokes which is just what I needed (for, e.g., Ctrl+ZXCV)! See Hasu's Geekhack topic for a little more info if you want, or just check my updated Configuration post above!

UPDATE, the SECOND: BASH on Windows 10 worked perfectly, and I've written some lines about it.

(At the end of the Install post)

Last edited by DreymaR (06-Sep-2016 21:28:50)

*** Learn Colemak in 2–5 steps with Tarmak! ***
*** Check out my Big Bag of Keyboard Tricks for Win/Linux/TMK... ***

Offline
  • 0
  • Reputation: 117
  • From: UK
  • Registered: 14-Apr-2014
  • Posts: 975

Hey DreymaR,

Curiosity finally got the better of me, and I ended up ordering one of Hasu's USB-to-USB converters! It arrived today...so now I am having a fun time figuring this out. I have compiled up the TMK stuff OK, so now I am at the point where I need the perfect "Colemak-DH-Exend" HEX file of my choosing!  Which is where your nice piece of work above comes in :P

In the instructions, I am up to this point:
Move all files from my usb_usb directory into tmk_keyboard/converter/usb_usb

I have done that, and am now trying to run the script using the "-d" option, since the TMK stuff is in a different path:

 ./makeflash_tmk_dreymar.sh -d ../tmk_keyboard/converter/usb_usb/

to which I get the result:

In file included from keymap_common.h:20:0,
                 from keymap_dreymar.c:17:
/usr/lib/gcc/avr/4.9.2/include/stdint.h:9:26: fatal error: stdint.h: No such file or directory
 # include_next <stdint.h>
                          ^
compilation terminated.
../../tmk_core/rules.mk:557: recipe for target 'obj_usb_usb/keymap_dreymar.o' failed
make: *** [obj_usb_usb/keymap_dreymar.o] Error 1

@@@ makeflash_tmk_dreymar.sh - ERROR: Make failed @@@

Probably I have misunderstood something. Am I using this "-d" setting correctly?


UPDATE: Please ignore the above. Figured it out. Was misssing:
sudo apt-get install avr-libc

Last edited by stevep99 (10-Jan-2017 17:38:32)

Using Colemak-DH with Seniply.

Offline
  • 0
  • Reputation: 117
  • From: UK
  • Registered: 14-Apr-2014
  • Posts: 975

I have got a resulting hex file, but I'm not convinced it looks right. Shouldn't I be able to load this into the TMK keymap editor to check it?  If I do that I get "Uknown Action" for all they keys. Don't want to try flashing the USB device unless I'm confident it's correct.

Last edited by stevep99 (10-Jan-2017 18:32:37)

Using Colemak-DH with Seniply.

Offline
  • 0
  • Reputation: 210
  • From: Viken, Norway
  • Registered: 13-Dec-2006
  • Posts: 5,343

Grats, and welcome to the Controller Freak Society! ^_^

You should start with the setup part, which includes using -a (install AVR tools) and -g (install git, and TMK from GitHub) if you haven't done those already. But you know that now. I thought I made that clear enough in the topic and in the help text of the script; didn't I?

Okay, I found one tripup:
3) Install the AVR Tools needed for compiling for and flashing to the chip with bash makeflash_tmk_dreymar.sh -a
Up until now, my post said to use the outdated '-i' for this. The '-h' option of the script should show the correct option switch anyway.

As for file locations, I now try to stay out of the usb_usb directory so I just make symlinks there. The new version of my script makes such links if they aren't there already. One reason for that, is that the unimap files should be useable for all the controllers in the TMK universe; I'm working with a PS/2-to-USB controller too now. You may say I'm hooked on Hasu's stuff. ;-)

I keep my makeflash script in the tmk_keyboard root directory, together with a _myunimaps dir containing the real map files.

I'm using Unimap now, so maybe you should be able to load the file into the Unimap editor. But I haven't tried that. I'd just flash the device and test it. You won't brick it or anything, just try. I'd advice you to test it with a simple keyboard first, as some more advanced ones use a lot of current on startup which may cause the USB-2-USB to fail if you're unlucky.

I guess you figured out how to set, e.g., CURLMOD 2 for your variant of the DH-mod? :-)

Last edited by DreymaR (11-Jan-2017 11:18:11)

*** Learn Colemak in 2–5 steps with Tarmak! ***
*** Check out my Big Bag of Keyboard Tricks for Win/Linux/TMK... ***

Offline
  • 0
  • Reputation: 117
  • From: UK
  • Registered: 14-Apr-2014
  • Posts: 975

Cool! Yeah, I noticed the script had some setup options, but I had already downloaded and compiled the original Hasu stuff before moving on to taking a look at your package. So I just skipped the setup stuff. Obviously I'd somehow missed the AVR tools bit though.

I don't really understand what you mean about unimap and these hex files. What I was originally expecting to happen, though, was this: (1) use your script to generate a colemak-extend hex file, and then (2) use the tmk editor to load in the output hex file, and make my own final custom changes (since our Extend and AltGr layers are not exactly the same).

But that turned out not to be possible, probably because of my misunderstanding about the various file formats. So I have instead gone ahead with just editing the keymap source file.

Yes I noticed the CURLMOD option, but actually, after seeing your ACTIVELAYOUT=55, I decided to create my own one called ACTIVELAYOUT=56, as it's easier to read the file if all the mappings are in one place, and you don't have to worry about nested if-blocks. This seemed to work well.

I have bitten the bullet and done a flash. Everything worked OK, so it was very nice to have such a clever thing working! I thought you had previously said something about Extend modifiers (S=shift, T=ctrl) not working properly, but so far I have found them to work perfectly!

However I do have one final problem!!  There seems to be something odd going on with angle mod translation. I have left everything as KEYMAP_AWIDEISO, and my bottom row of mappings looks like this:

LSFT ,NUBS,Z ,  X ,  C ,  D ,  V ,  K ,  H ,COMM,DOT ,SLSH, RO ,    RSFT...

Unfortunately this produces the following translation from (qwerty) key to symbol:

ISO-> x
Z -> c
X -> d
C -> v
V -> \
B -> z

So as you can see, very weird, as though it applied a double-angle-mod or something. I get the same result if I use your ACTIVELAYOUT=55 as well. The wide mod part works fine though and mappings are transposed as expected. Any ideas on the angle mod anomaly?

Last edited by stevep99 (11-Jan-2017 17:02:41)

Using Colemak-DH with Seniply.

Offline
  • 0
  • Reputation: 210
  • From: Viken, Norway
  • Registered: 13-Dec-2006
  • Posts: 5,343

The Extend modifiers work, but not in conjunction. So Ext+S+N is select previous character, but Ext+S+T+N doesn't select previous word as it should. Instead, it types S and T or something.

I don't use that layout 55 anymore. I've added the "DreymaR ISO/Nor hack" as an option (more of those if directives, heh) instead. But it worked fine for me, so I'm not sure what you've encountered. With KEYMAP_ANGLEISO, do you get the same thing? And everything's normal with the non-angled map (I've forgotten its name)?

I've uploaded a new version of my files, using UNIMAP files instead of the old map types (it's something Hasu uses, to fit different formats). Try that, and see if it works better for you! :-)

*** Learn Colemak in 2–5 steps with Tarmak! ***
*** Check out my Big Bag of Keyboard Tricks for Win/Linux/TMK... ***

Offline
  • 0
  • Reputation: 117
  • From: UK
  • Registered: 14-Apr-2014
  • Posts: 975

Hey DreymaR,

For me, Ext+S+T+N is working fine. Selects previous word as you'd expect!

I have downloaded the new version but I'm guessing you're missing some stuff: I see keymap_dreymar_old.c and keymap_dreymar_old.h only. I'm assuming "_old" means the files are, well, old :P
UPDATE: OK, so I guess I'm supposed to copy the files from "_myunimaps" now instead. I have it working again now. I also had to change the script quite a bit. Some of the path references seemed to be wrong and I had to add the ".hex" extension to the flash command otherwise it didn't find the file.

But nonetheless the angle mod (ZXCDV) is now working fine in this new version. Haven't figured out how to change the AltGr mappings yet though.

Nice work on this project, having this device with a fully operation portable colemak+extend is a great thing. And contrary to my expectations, Extend is fully operational as well.

I have a suggestion. It seems your files are basically an extension to the tmk_keyboard project. So I think the best approach would be: simply fork the "tmk_keyboard" project on github, and then add your additional files to it!

This would mean any prospective user (eg me!) would simply need to get clone your repo from github and it would be ready to run: there would be no need to worry about paths to other projects, moving around files, specifying directories, etc. And it would be easy to maintain updates. What do you think?

Last edited by stevep99 (13-Jan-2017 16:46:10)

Using Colemak-DH with Seniply.

Offline
  • 0
  • Reputation: 210
  • From: Viken, Norway
  • Registered: 13-Dec-2006
  • Posts: 5,343

You're sending key codes (scan codes) so you can't do a thing about AltGr mappings. Well, you could make a macro that depresses AltGr and then the key in question but that's cumbersome and won't get you any glyphs that aren't in your system layout. For the Extend layers, I have a few such Shift+key macros as well as the Ctrl+ZXCV ones.

I'm a git n00b so I haven't been good at this forking business. Yes, I'd like to get around to that. For now however, as you can see I've recently made the transition from KEYMAP_ALL which was for the USB-2-USB converter and to UNIMAP formats which can be used on all converters! It's the future. :-) So I'd like a little more polish and testing before I start forking. I'm working on it these days (albeit a bit slowly). One thing I want, is a more readable format for the ergo mappings. I'm on it. Also, I want to test it properly with my PS/2-to-USB Hasu controller. I got some weird results on the first functional test.

You shouldn't have to move anything. The proper way of using my files is to put the makeflash script where you want the repo and run it with the install switches. Then it'll copy itself and the right folders inside the tmk_keyboard folder and everything should be set up for use. If all files are in the right places, they should work as expected.

It says clearly in the script that it should be placed beside or inside the main tmk folder (which is what happens when you install through the script); this goes for the accessory folders too (the "_my..." ones). Are you saying that you did this and some paths still got wrong?

About the '.hex' thing with flashing, it's possible that I've changed a variable and missed that one. Line 308 of makeflash should then read:

    dfu-programmer $MyChip flash "${Target}.hex"    || MyError "$MyChip flashing failed"

(I think...)

Last edited by DreymaR (14-Jan-2017 16:21:19)

*** Learn Colemak in 2–5 steps with Tarmak! ***
*** Check out my Big Bag of Keyboard Tricks for Win/Linux/TMK... ***

Offline
  • 0
  • Reputation: 117
  • From: UK
  • Registered: 14-Apr-2014
  • Posts: 975

Well, I hadn't used the mentioned install features of the script, having already gotten the other stuff first. So perhaps it's my fault for not following the recommended methodology. I was running the script from it's original location. I had to add adjust the path where it would backup the generated hex file, it was missing "tmk_keyboard_dreymar" I think.  Yes, I fixed the ".hex" problem doing exactly the change you suggested.

I see what you mean about AltGr. Makes sense. It's not a biggie though, Extend is easily more important and that works like a charm!

Ah yes, Git.  There is a lot of depth to git and it seems intimidating at first - I didn't much like the look of it at first either, coming from a Subversion background, which is somewhat simpler. But in practise most of the time there are only small set of things you have to ever have to do: clone, add, commit, push. So it's not as onerous to get into as you might imagine. Forking for example can even be done as simply as going to https://github.com/tmk/tmk_keyboard, logging in, and hitting the "Fork" button.

It's not meant to sound like a hard sell, but once you're ready to dive in, I do think your projects will benefit from it!

Last edited by stevep99 (14-Jan-2017 17:16:14)

Using Colemak-DH with Seniply.

Offline
  • 0
  • Reputation: 210
  • From: Viken, Norway
  • Registered: 13-Dec-2006
  • Posts: 5,343

I use this:

MyMaps="${MyPATH}/_myunimaps"   # (--) The subdirectory with DreymaR's keymap files (Unimap)
MyHxBk="${MyPATH}/_myhexfiles"  # (--) Optional directory for .hex file backup

So the backup and unimap dirs should be placed in the same dir as the makeflash script, and all should be fine. However: The makeflash script should be placed either beside or within the tmk_keyboard dir. I put mine inside tmk_keyboard root, with the above mentioned folders, as per its install defaults.

tmk_keyboard_dreymar itself should only be needed for installing, not for build/flash.

Last edited by DreymaR (16-Jan-2017 09:44:09)

*** Learn Colemak in 2–5 steps with Tarmak! ***
*** Check out my Big Bag of Keyboard Tricks for Win/Linux/TMK... ***

Offline
  • 0
  • Reputation: 210
  • From: Viken, Norway
  • Registered: 13-Dec-2006
  • Posts: 5,343
UPDATE: Everything is updated to the Unimap file format, which works with all TMK compatible controllers.

The script is a bit cooler now, too, with enhancements of the work flow. If you let it make a backup of your .hex file, you can clean up the build files directly at the end of a run.

I've built .hex files for Hasu's PS/2-USB converter and it seems to be working fine. Yay! :-)

Last edited by DreymaR (17-Jan-2017 13:25:54)

*** Learn Colemak in 2–5 steps with Tarmak! ***
*** Check out my Big Bag of Keyboard Tricks for Win/Linux/TMK... ***

Offline
  • 0
  • Reputation: 21
  • From: Chicago
  • Registered: 27-Apr-2016
  • Posts: 221
DreymaR said:

I'm really hoping that the upcoming Teensy 3.5/3.6 can be used for TMK! These devices are fast, have a lot more Flash/RAM (512/192 kB for 3.5; 1024/256 kB for 3.6) and most importantly, come with a second USB intended for Host mode so it won't need a separate USB host! That may make it a cheap and powerful option; someone will hopefully test this soon.

Hi DreymaR,
Are there any news regarding the Teensy 3.6 usage in USB2USB?

Last edited by ckofy (19-Jan-2017 17:32:35)
Offline
  • 0
  • Reputation: 210
  • From: Viken, Norway
  • Registered: 13-Dec-2006
  • Posts: 5,343

Nope ckofy. No news, no response on Geekhack so far. Grrr.

https://geekhack.org/index.php?topic=41 … msg2346413

Last edited by DreymaR (24-Jan-2017 09:51:35)

*** Learn Colemak in 2–5 steps with Tarmak! ***
*** Check out my Big Bag of Keyboard Tricks for Win/Linux/TMK... ***

Offline
  • 0
  • Reputation: 210
  • From: Viken, Norway
  • Registered: 13-Dec-2006
  • Posts: 5,343
stevep99 said:

Forking for example can even be done as simply as going to https://github.com/tmk/tmk_keyboard, logging in, and hitting the "Fork" button.

It's not meant to sound like a hard sell, but once you're ready to dive in, I do think your projects will benefit from it!

Indeed. So, I kinda sorta did it. Please advise me on whether I did okay! :-)

https://github.com/DreymaR/BigBagKbdTricks_TMK

I made a repo for my changes instead of a TMK fork. This is because i'm trying to keep all my files to myself (mostly). It should be possible to plop them all into the tmk_keyboard root folder, or to keep them in my dreymar_tmk folder which may be inside or beside the tmk root folder! All of these options should work now. I hope.

So, if my folder is put inside the tmk root folder it'll be pretty much like a submodule won't it? Except it will use the main repo instead of vice versa, but git doesn't care about that. So if in the future someone wants to merge these things, they could just add my repo as a submodule in Hasu's. If I've understood this correctly... :-o

What do you think? When it's been approved, I'll update my posts with GitHub links.

Also: License. Hasu doesn't have one I think? But the GNU GPL seems like a good idea in general?

Last edited by DreymaR (11-Aug-2017 12:28:43)

*** Learn Colemak in 2–5 steps with Tarmak! ***
*** Check out my Big Bag of Keyboard Tricks for Win/Linux/TMK... ***

Offline
  • 0
  • Reputation: 117
  • From: UK
  • Registered: 14-Apr-2014
  • Posts: 975

Oh, that's exciting!

Well, this is only my opinion, so YMMV:

I'm not a fan of copying one project's files to inside the folder of another. It means they show up in git as changes, and when you update you have to worry about which files are from which project etc.

Your second option, of having distinct folders for each project, and just knowing the path between them, seems a better idea to me!

I think the "plop them all into the tmk_keyboard" option would work well if you had decided to go down the fork route. In that case, you could indeed have added your stuff as a submodule to hasu's project, and that would work OK also.

The way you have done should also work well though, but for maximum simplicity¹ for new users, I'd suggest you have your docs advise people to use the two separate folders method.

¹ maximum simplicity => minimal git problems

Last edited by stevep99 (26-Jan-2017 16:37:34)

Using Colemak-DH with Seniply.

Offline
  • 0
  • Reputation: 117
  • From: UK
  • Registered: 14-Apr-2014
  • Posts: 975

Is that a typo? Have your keyboard tricks become Big and Bad ?  :-P

Using Colemak-DH with Seniply.

Offline
  • 0
  • Reputation: 210
  • From: Viken, Norway
  • Registered: 13-Dec-2006
  • Posts: 5,343

Haha, yes – the tricks have been big and bad for a long time now in case you hadn't noticed! :-D

URL fixed, thanks to you my observant friend.

Okay, I think I got the link between command line and GitHub to work again. I used the GitHub desktop app. I know, it feels a bit like cheating but wth.

The "maximum simplicity for users" should be in place, combined with a good deal of flexibility. These methods should work:
• Put the dreymar dir next to the tmk dir (what I prefer to do now, to keep things separate)
• Put the dreymar dir inside the tmk dir (submodule style – I know, it's not entirely git friendly; if you're going to push you'll need a .gitignore)
• Put the files from the dreymar dir inside the tmk dir ("fork style"; a bit more intrusive but smooth in use)

It's a bit of a hassle to handle all the possibilities that symlinks give. Going into a dir via symlink and then up one level may put you somewhere you didn't expect to be it turns out... ;-)

Last edited by DreymaR (03-Feb-2017 15:41:11)

*** Learn Colemak in 2–5 steps with Tarmak! ***
*** Check out my Big Bag of Keyboard Tricks for Win/Linux/TMK... ***

Offline
  • 0