THE TARMAK (TRANSITIONAL COLEMAK) LEARNING LAYOUTS
"Tarmak may well be the best transitioning mechanism not only in the Colemak universe, but in layouts period."
~ Lalop

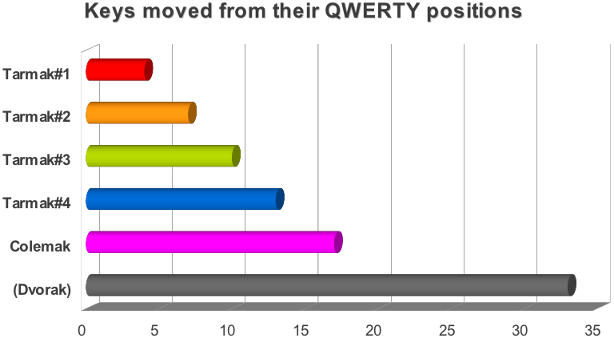
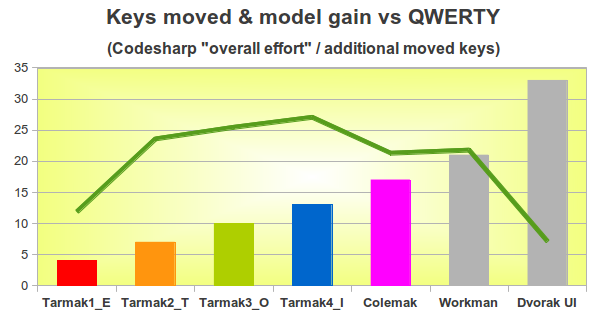
The Colemak optimized layout changes 17 keys from QWERTY. This is far less drastic than the well-known Dvorak layout with up to 33 changed keys but no benefit over Colemak (although that's hard to prove either way!). Some people feel that it's okay to change everything and that knowing each layout is like knowing a separate language, but at the same time it's a lot more work for an English speaker to learn Japanese than, say, German!
But even 17 key positions aren't learnt in a jiffy and not everyone has the time or stamina to make a switch that may hit your work efficiency for weeks. Therefore, some have made more minimalistic layout changes such as the Minimak layouts that let you change only 4, 8 or 12 keys and still gain decent benefits. But those don't have the effectiveness of a properly optimized layout like Colemak so it's still a tough choice for the weary traveller.
What if you could change only 4, 7, 10 or 14 keys, each step a progression from the former, gain incrementally better key positions as you go and end up with the typing power of a fully operational Colemak? Using the Tarmak layouts, you can! Please read on, and I'll show you how.

NOTE: This may not be the perfect way for everyone. Some people prefer learning Colemak by diving straight in, the "cold turkey" approach. Some like to do "QWERTY by day, Colemak by night" for a while before making the jump. But some have used Tarmak to get a more gradual learning experience and have liked it a lot. So if you think this might be for you, read on!
HOW DOES IT WORK?
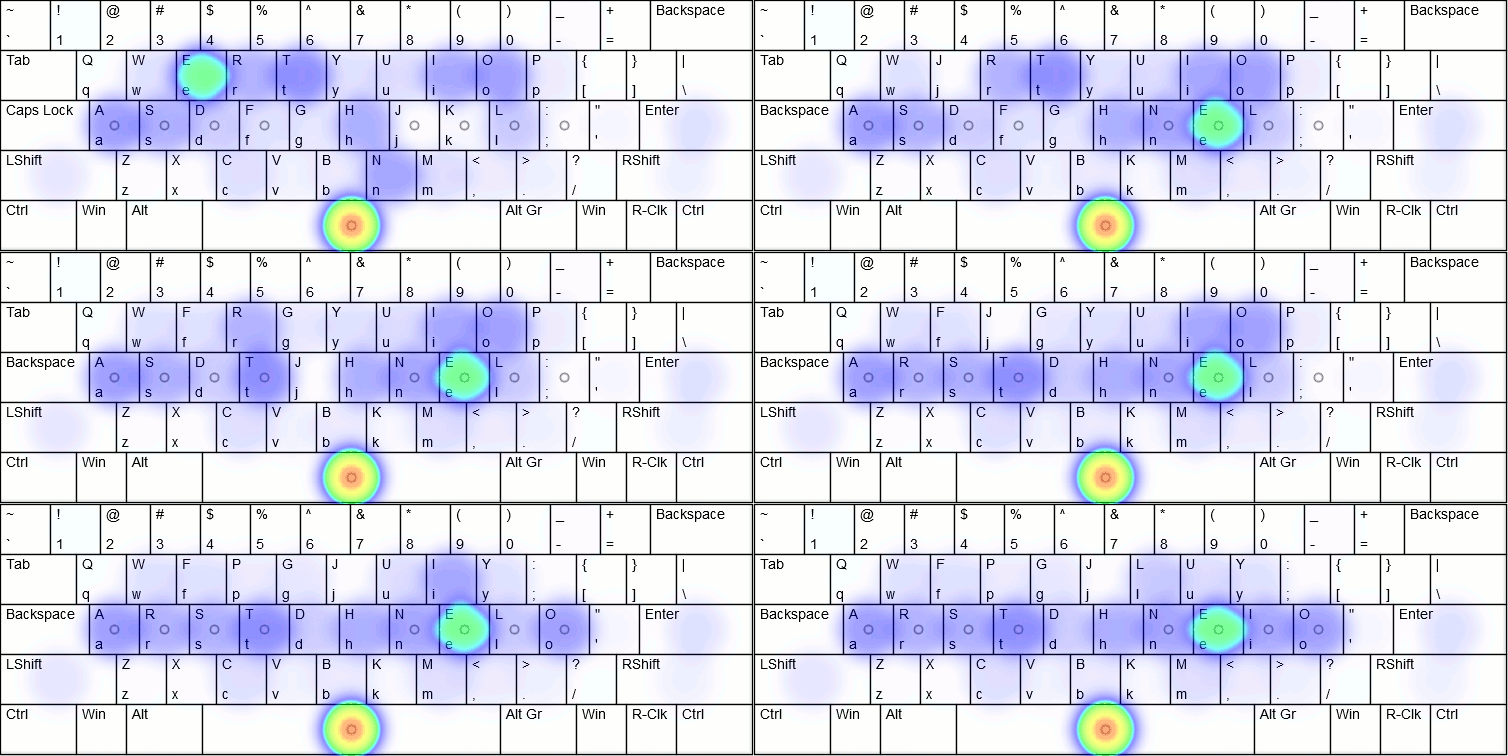
Each of the 4 Tarmak layouts changes 3–4 new keys from the previous step until you've made the full transition to Colemak. This is done by breaking up the loop of keys that move into each others' positions, misplacing only the very infrequently used J in the process. There is one big loop of 14 changed keys (Y>O>;>P>R>S>D>G>T>F>E>K>N>J) that you can learn in up to four steps, and one small self-contained loop of 3 keys (L>U>I). Each Tarmak step brings at least one of the most common letters in English (ETAOINSHR) to the home row where it belongs, right under your fingertips.
This animated image, like the one at the top of this topic, shows the full Tarmak transition from QWERTY to Colemak. The keys moved into place for each Tarmak step are shown in a different color following the rainbow from red via orange, green and blue to violet.

Here I've explained each of the Tarmak "tar lumps" in more detail:
1) The (J)>E>K>N "most essential" loop, fixing the important E (and N)
Tarmak1(E)
2) The (J)>G>T>F loop, bringing the important T into place
Tarmak2(ET)
3) The (J)>R>S>D loop, getting RSD into place – all of which are relatively frequent!
Tarmak3(ETR)
4) The J>Y>O>;>P loop, getting O in place and finalizing the big loop
Tarmak4(ETRO)
5) The L>U>I self-contained loop - step 5 is simply the full Colemak!
Tarmak5 = Colemak
Here are the spectrally coded Tarmak steps again, together in one Colemak image. Not shown in this figure is how the J hops between temporary positions (QWERTY E, G and R) before finding its place; that's explained above.

The next image shows the Tarmak steps leading to the Colemak-DH ergonomic variant, should you be interested. I like it!

This image shows Tarmak-DH on an ANSI Angle(Z) modded board, leading to Colemak-DH.
On an ISO keyboard you can use a simpler Angle mod without splitting the ZXC keys.)
USER FEEDBACK
There have been several positive reports from satisfied Tarmak users.
The very first Tarmak user was Ezuk. Working as a writer, he gave up going cold turkey because he needed his fingers with him at all times. He used the 3-step 2008 version of Tarmak over a period of several months to ensure full typing fluency and wrote a very positive blog review that got some attention. More recently he's written an excellent promotion post for the updated Tarmak with notes on using PortableKeyboardLayout to learn and use the layouts. Highly recommended reading!
It’s Free, Easy To Use, And Won’t Kill Your Productivity
Here is why Tarmak is the best way to learn a superior keyboard layout:
• It’s free: Won’t cost you a dime.
• It comes as a portable app: No coding; no registry hacks; you don’t even have to install anything or be an Administrator.
You can even put it on a USB stick and use it on any computer you get to.
It’s based on AutoHotkey, one of our favorite automation tools, and it’s open-source.
• It won’t kill your productivity: Throughout your learning process, you’ll still be able to type.
If you’re patient and don’t rush ahead, there won’t be a single moment where you’ll feel you just can’t type.
• It’s easy to move between stages: Want to move on to the next step? It’s as easy as a right-click on a system tray icon.
Too hard for you? No problem, step back.
• Comes with keyboard images: It’s sometimes hard to visualize where the new keys are,
especially since your keyboard is now “wrong” (shows you the old keys).
Tarmak comes with helpful images that show you the different stages.
Here's what user Ghaz had to say:
The transitional layouts worked really well for me because of the following:
• High bang for buck in the initial stages
• Low risk - still a worthwhile endeavor if I get stuck at a stage for a year
• Allowed me to concentrate only on a few keys at a time, and mostly master them before moving on
• Low productivity loss
• The only keys that are moved twice are infrequently used [Note: Both J and semicolon were moved more than once at that time]
• By moving on to the later stages after a shortish time, their new position had barely been set in my mind
As shown in the graph below from the Amphetype program, user Coldmak had a smooth 9-day transition to Colemak. He obviously worked quite hard for it as shown by the many test points on the graph, but kept his typing speed above 20 words per minute (although he probably rushed the last step a little) and reported a pleasant experience. After that transition, his Colemak typing speed kept rising as you can see in his topic.

Similarly, user bph found Tarmak very useful:
My approach has been to stick with a stage until I exceed 30 wpm then move to the next [each stage took about 3 days]. Predominantly I have just forced myself to use tarmak at work for everything (mainly emacs) but with a bit of typeracer thrown in for fun
[...]
I think these stages are a really good way of breaking down a very tough task,
there is no way i could do this cold turkey direct to colemak
[...]
So all in, I think going qwerty to colemak via tarmak will take half the effort as learning to touch type qwerty from scratch
I started my Tarmak project [...] with a plan to step up each Friday after work. I made the final transition [in a month]. It's been just over a week and I've timed out in Amphetype twice at over 50 wpm / 97% accuracy, though my average is still only in the 40's. Each week I was able to fairly easily climb back from the instant "hit" to reliably over 40 wpm / 97% accuracy before the next step.
I typed on Qwerty for over 30 years. DreymaR's Tarmak method finally gave me the gradual methodology I needed to move to a better keyboard layout [...] and (for me the final piece of the puzzle) the Tarmak transition method puts [Colemak] truly within reach of people who actually have to keep getting work done while working on the transition.
Here is the best part, are you ready? Some genius figured out that you can make a smooth transition from QWERTY to Colemak in five small steps! Each step is just swapping a couple of keys and thus you don’t have to be useless.
The time spent on Tarmak was an insignificant slice of the total time to get here, and I've not made any "Tarmak mistakes" since shortly after switching away from Tarmak 4. So it's clear that for me, using Tarmak couldn't possibly have slowed down my learning to any significant degree at all. But as a means of maintaining motivation in the early days, I found it very useful, and I think it made the difference between carrying on and giving up (as I did the first time I tried, sans Tarmak).
MINI-FAQ
Q: What about that J key jumping all over the place – won't that be both confusticating and bebothering?
A: Don't worry! As seen in the 'analysis' section below, the J is the rarest key not moved from its QWERTY position. As such, it won't get too ingrained during the transitions. You'll be more preoccupied with the frequently used keys that move to better places, and those will be learnt faster.
Q: I'm put off by doing so many steps to get there!?
A: Feel free to skip one or more steps. The transition can be made to suit your preferences. I think Tarmak2(ET) is really good in terms of gain, and it moves a few keys on each hand if you want to train both hands at the same time. That's probably where I'd start if I were feeling impatient and bold. After that, one possibility would be to do the important but tricky RSD loop before moving to full Colemak.
Q: When should I switch to the next step?
A: When you feel ready and up to it! It has been suggested that you should aim for about 97% accuracy at 40 WPM before you move on to the next step. That sounds about right to me, but to each their own. You definitely shouldn't rush it but then again you may not want to get too cozy with each temporary step either. Finally, if you need to be fully productive right now you can take the next step later when you have more time. It would probably make more sense to advance on Friday night than in the middle of your workweek, for example.
Q: Argh! R and S are so annoying! How could Shai do this to me?
A: Many Colemak learners struggle at first with S changing fingers and R skipping over it; it's extra noticeable since Colemak has few keys changing fingers from QWERTY. The predecessors of Colemak had S in its QWERTY place but making a good enough layout that way didn't prove possible so in the end S had to move. Consider that FS/SF and SC/CS are much less common bigrams than FR/RF and RC/CR, and typing same-finger bigrams fast is tiresome. Tarmak step 3 moves only R S D, and so at least you get to learn the new S placement without too much else to think of at the same time.
Q: What on earth is Tarmak(ETROI) versus Tarmak(ETOIR) versus Tarmak(#@¡€%)?
A: There have been a couple of earlier variants of Tarmak. ETOIR is the previous Tarmak progression from 2011, and ETROI the new one from 2014. They're named after which important letter each step brings to the Colemak home row; see the 'naming and history' section below if you're interested. If not, nevermind! :-)
Q: Can I learn the L>U>I loop earlier? It's so cute and I want to do it as a warm-up for things to come.
A: The first "Tarmac" layouts had the LUI loop as the first step, but that didn't give enough benefit for the effort and led to some nasty same-finger bigrams (when you have to use the same finger for two consecutive strokes – I hate that). You may move the LUI loop if you wish; ask me for how to do this if you're interested. It's small and quite easy to learn – but on the other hand you may want to finish the big loop as soon as possible. But beware that if you do the LUI loop before the O is in place you may incur bad OI/IO bigrams.
DREYMAR'S BIG(!) BAG OF TRICKS?!? HALP, I'M NEW HERE!
– If you check out my sig topics, you'll see that there's a lot you can do in addition to learning Colemak! Some of it doesn't even require Colemak.
– So, this is a little beginner's introduction to the wonders of layout modding: What are your main options, and what's good to begin with?
– If any of this interests you right away, read more about it in my Big Bag of Tricks topics.
– Extend: This mod is as brilliant as Colemak itself, and independent of your typing layout! It lets you navigate, edit and more without moving your hands.
• You could learn to Extend before you learn Colemak, during, or after; both EPKL(Win) and XKB(Linux) let you do that.
• See the Extend Extra Extreme topic if you need convincing.
– Angle/Wide ergo mods: These are also basically layout independent. QWERTY-AngleWide is definitely possible.
• The Angle mod is simple, especially on a PC105/ISO keyboard: Slide ZXCVB one step to the left, keep your fingering but straighten your left wrist. Comfy!
• If you have an ANSI keyboard, you must make a tradeoff: Move the Z key back to the middle ("Angle-Z"), or, e.g., use the Shift key for it ("Fat-Z", harder to implement).
• The Wide mod is quite simple on any keyboard: Slide the right-hand keys one step to the right, improving hand distance and thumb/pinky reaches. Neat!
• These are "hard" mods, you could even change the physical key caps to Angle/Wide positions if possible. My wife typed QWERTY-AngleWide without trouble.
– The Colemak-DH a.k.a "Curl(DH)" ergo mod: A Colemak-specific mod. Moving the common D and H down makes them easier to reach with lightly curled, relaxed fingers!
• NOTE: There is a tweaked Tarmak progression for Colemak-DH!
– Colemak[eD]: This only affects you if you'll be using the AltGr key, as it's about the extra mapping layers on each key.
• Vanilla Colemak has several AltGr mappings, but they seem somewhat unintuitive and not really practical to me.
• My "[edition DreymaR]" mappings place useful symbols and letters quite intuitively.
• Further symbols/letters are on dead keys that all reside on symbol keys with AltGr. In PKL(Win) at least, there's a huge(!) bunch of glyphs/symbols!
• If you use any of my Big Bag files you'll mostly get Colemak[eD].
– Locale layouts: If you use other languages than US English, you may want some special letters, accents and symbols readily available.
• I've devised lots of Locale Colemak variants.
• Using XKB(Linux), you'll have access to all these once you're done with Tarmak. With PKL(Win), you may have to make yours or ask me.

My Unicomp SpaceSaver Buckling Spring (IBM Model M ISO type) keyboard with "American/Ninja" caps, splendidly sporting the Colemak-CAW layout.
THANKS
I'd like to say thanks to all the wonderful people of the Colemak forums and elsewhere who have contributed in various ways, with testing, analysis and/or discussions. Many of them are mentioned above, but if anyone is left out it's an oversight and nothing else. In particular, I have to mention ezuk, cevgar, karl and lalop who made such valuable contributions all bringing this idea forwards. Also, thanks (again!) to Shai Coleman for making Colemak in the first place!
TARMAK DOWNLOADS
Materials:
• Feel free to use any images from this topic or my EPKL files for learning aids. Just give me credit for them, please.
• If you need a set of printable/hi-res images like the ones in this post, you may use these that I've rendered at twice the normal resolution.
• My EPKL files contain compact help images for the Tarmak steps in different configurations, see below.
Windows:
• Here's my full EPiKaL PortableKeyboardLayout repo at GitHub as described in the Big Bag Of Tricks (for PKL) topic. It should run portably without much fuss. There are layouts for ISO and ANSI(US) keyboards, vanilla or Colemak-DH, and more.
• Tarmak steps come with EPKL and can be selected quite easily. In EPKL_Settings.ini there are some commented-out layout lines like this one:
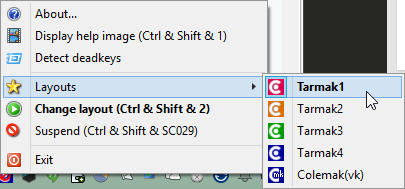
;layout = Tarmak\Tmk-VK-Tm1_@K:Tarmak1,Tarmak\Tmk-VK-Tm0_@K:QWERTY• Remove the semicolon from that line (and ideally add one to the uncommented layout line below) then refresh EPKL and you should have Tarmak. You can use one line that cycles through the Tarmak steps on layout switch by menu or hotkey (default Ctrl+Shift+2), or like the one I quoted here that only switches between a Tarmak step and QWERTY. You could easily edit the number 1 in that line to 2, 3, 4 or 5 – which is Colemak but in the same style as the Tarmak steps.
Linux et al:
• For XKB, see the Big Bag Of Tricks (Linux/XKB) topic. After installing, search for 'Tarmak' in the layout chooser.
• User olemartinorg (as described in this forum topic) has provided an Xmodmap makefile that'll generate Tarmak steps from your existing layout. Clever, and can be useful if you prefer Xmodmap over messing with the XKB files. Keep in mind though, that my XKB solution is more complete.
Mac:
• The KeyRemap4MacBook aka Karabiner creator "Tekezo" has added the Tarmak steps (to vanilla Colemak, no mods) to the default options. That's so nice.
Thanks to user bombdiggity who contributed to that happening.
• User BradWright made all the Tarmak steps available as a private.xml file for Karabiner.
• User opiusic has made OSX layout install files for both the default ETROI and the older ETOIR progressions (based on the older ones by user ghaz which only had the ETOIR progression). Additional instructions for these can be found over at the LanguageGeek pages.
• User mkborregaard has made a Karabinier implementation of the Tarmak-DbgHk (old Colemak-DH version) steps (and more; see this forum topic).
• GitHub users shelbyd and professor have a Mac OS 10.9 repo with Tarmak.
USB-2-USB and other converter/controller devices:
• These are little hardware devices that plug between your keyboard and computer or whatever you type to. They're fully OS independent.
• See the Big Bag Of Tricks (USB-2-USB) topic, and links therein.
• GitHub user professor has an Arduino Keymapper repo that includes Tarmak.
*** Learn Colemak in 2–5 steps with Tarmak! ***
*** Check out my Big Bag of Keyboard Tricks for Win/Linux/TMK... ***


